yesterday my PM asked me whether our sharepoint site can export tasks into mic.project and why our gantt chart is not as advance as the gantt chart in the microsoft project.
well, for me, given a sudden 2 second to answer without any research i can only say that "supposely it can-since data from SP can be exported to excel. plus its microsoft product to begin with. All mic. product usually have availability to sync to sharepoint2010"
So, then during the seminar waiting time i started googling to find the answer. I know she'll come back and ask the same thing next year, right after my cuti ends.
so here's the beginner link :http://www.microsoft.com/project/en-us/sync-sharepoint.aspx
SELAMAT BERSEMINAR!!

My SharePoint Life..This is where i dumped it all in.
Wednesday, 14 December 2011
Tuesday, 6 December 2011
asp:ListView control
from : http://weblogs.asp.net/scottgu/archive/2007/08/10/the-asp-listview-control-part-1-building-a-product-listing-page-with-clean-css-ui.aspx
The asp:ListView control (Part 1 - Building a Product Listing Page with Clean CSS UI)
One of the new controls in ASP.NET 3.5 that I think will be very popular is the <asp:ListView> control. The ListView control supports the data editing, insertion, deleting, paging and sorting semantics of higher-level controls like the GridView. But - unlike the GridView - it provides you with complete control over the html markup generated.The ListView control, when combined with the new Web Designer and rich CSS support in VS 2008, enables you to build much cleaner HTML UI. Over the next few weeks I'll be putting together several blog posts that show off how you can use it.
Building a Products Catalog Page
For today's blog post we are going to start simple and just build a basic product catalog listing page like below:
This products.aspx page will take a Catalog index in the URL, and use LINQ to SQL to retrieve and display product information. We will also enable paging navigation at the bottom of the product listing (and do all of the paging operations in the database - so that only 6 products at a time are retrieved from the database).
The HTML markup output from the server will be 100% CSS based (no tables or inline styles).
Step 1: Defining out Site Layout with Nested Master Pages
Before we start working on our product page, we'll first want to define the overall UI and layout structure for our site.If you are "design challenged" like me, one approach you might want to take with a new site is to get started by using one of the free HTML site templates that you can download from these two sites: http://www.opensourcetemplates.org/ or http://www.oswd.org/. The templates on these sites are pure HTML (meaning you can use them with any server-side programming technology), and are built using clean CSS and XHTML markup. For this blog post I decided to go with the "TerraFirma" template here.
After I downloaded the template, the first thing I did was to create a root "Site.Master" Master Page that defined the overall layout structure for the site. I then created a few nested master pages to define different column style layouts ("SingleColumn.master" and "TwoColumn.master"). VS 2008 now has great support for creating and using nested master pages that makes doing this easy. You can read about how to define and use them in my earlier VS 2008 Nested Master Page Support blog post.
Once we have created our master pages layouts, we can then create a new product catalog page for the site that is based on the single-column nested master page (click below for a full screen picture):
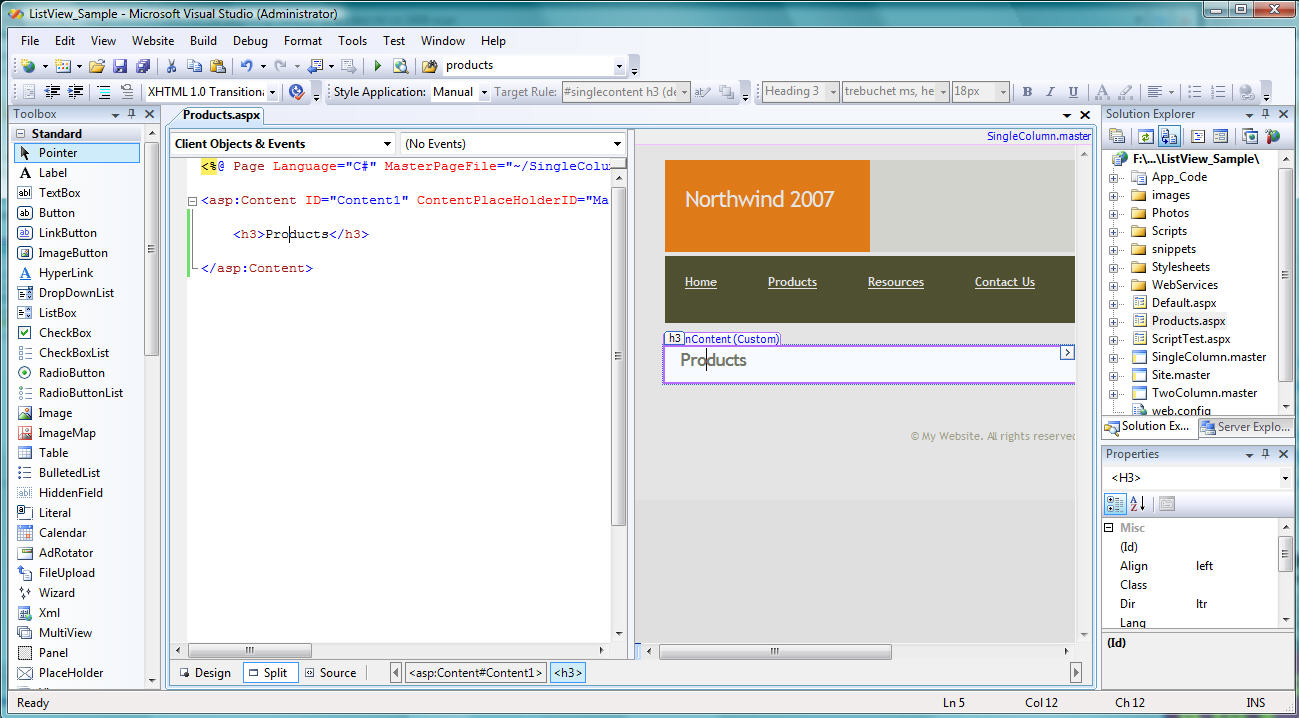
Notice above how we can edit the page using the new VS 2008 Split View mode feature. Above I'm using the "Vertical Split View" option so that I can see both the source and design view on a wide-screen monitor. You can learn how to enable this in my earlier Enabling Vertical Split View in VS 2008 blog post.
Step 2: Defining our CSS Rules using Mock HTML UI
When it comes to defining our product UI for the page, there are a couple of different approaches we can use. One would be to start by writing code to generate some dynamic data UI, and then work to make it pretty. Another approach we could take would be to start by mocking up the HTML UI first, and then once we are happy with it write the code to make it dynamic. For this blog post I'm going to take this second approach.To start let's just add a standard <ul><li> list of product content into the page:

As you can see above, this <ul> list looks pretty unattractive, and obviously not like what we want our product listing page to look like. To make it more attractive, we'll use some of the new CSS editing features I covered in my earlier VS 2008 Web Designer and CSS Support blog post.
Specifically we'll want to open the new "Manage Styles" tool window in VS 2008 (you can open this by selecting the Format->CSS Styles->Managed Styles menu item):

The manage styles window provides an easy way for us to see all CSS rules currently in our CSS stylesheet. It also enables us to quickly lookup CSS selector values, refactor css rules across stylesheets, and create new rules.
We can create a new CSS rule for our product listing by selecting the "New Style..." link in the "Manage Styles" window. This will bring up a dialog that enables us to choose where we want to define the CSS rule, and configure what settings we want for it. For this sample we'll name the CSS selector ".productslist li" and select the "Define in existing style sheet" option to add it to the external stylesheet we already have for our application:

We can then hit "ok", and return back to source mode to assign the CSS rule on our <ul> list (note how VS 2008 now provides CSS intellisense in source view):

Currently our CSS rule doesn't have settings assigned to it, so our <ul> list will still look the same as it did before. We can change that by assigning some CSS settings.
There are a couple of ways we could set these CSS settings: 1) open up the CSS stylesheet and set them in source mode, 2) use the manage styles dialog we saw before to set them, or 3) use the new CSS Properties Window to edit the CSS rules in real-time within the designer. We can bring up the CSS Properties Windows via the View->CSS Properties menu:

When you select an element either in source-view or design-view, the CSS Properties Windows will list all of the CSS rules that apply to it. The "Applied Rules" list at the top of the CSS Properties window indicates the precedence order of cascading rules. The CSS properties list below it then shows all of the setting values assigned to that element.
The "target rule" drop down in the style application toolbar (circled in red above) indicates which CSS selector a change in the CSS Properties window will be assigned to. In the example above our .productlist li rule is the CSS selector we currently have selected - which means as we set values in the CSS Properties window they will be persisted under that rule name in our external CSS stylesheet. No style settings will be persisted inline the HTML page.
Let's now make some changes to our "productlist li" CSS rule. First we'll change the layout display mode to be "inline":

We'll then want to float each <li> to the left:

And lastly we'll set the bottom and left margin of each <li> element to be 15px to space out the products nicely:

Notice how when we are done no inline styles have been saved in our HTML page:

Instead they've all been cleanly saved under our "productlist li" CSS selector in the external CSS stylesheet:

Now all that remains is for us to replace the static HTML with some dynamic data coming from a database.
Step 3: Defining our LINQ to SQL Data Model
We'll use LINQ to SQL to retrieve our product data from the database. LINQ to SQL is a great new ORM (object relational mapper) implementation built into .NET 3.5. You can learn more about it from my on-going LINQ to SQL blog series (more posts in it coming soon):- Part 1: Introduction to LINQ to SQL
- Part 2: Defining our Data Model Classes
- Part 3: Querying our Database
- Part 4: Updating our Database
- Part 5: Binding UI using the ASP:LinqDataSource Control

Once we have our LINQ to SQL data model defined, we are ready to use the <asp:listview> control and bind the data to it.
Step 4: Convert our HTML Mock UI to use the <asp:ListView> control
The <asp:listview> control is a template-driven control. The control itself outputs no "built-in" UI, nor any actual HTML markup. Instead, you can define whatever markup *you* want displayed using the below templates:- LayoutTemplate
- ItemTemplate
- AlternatingItemTemplate
- SelectedItemTemplate
- EditItemTemplate
- InsertItemTemplate
- EmptyItemTemplate
- EmptyDataTemplate
- ItemSeparatorTemplate
- GroupTemplate
- GroupSeparatorTemplate
Within the <LayoutTemplate> you then define an "ItemContainer" control that indicates where you want the <asp:ListView> control to dynamically add the <ItemTemplate> items into the output markup.
To see how this works in action, we could take our mock products HTML UI:

And replace it with a <asp:listview> that can dynamically generate the exact same markup output like so:

Notice above how I am using a <asp:placeholder> control in the <LayoutTemplate> to indicate where I want to add in my items in the list. I could use other controls instead as the itemContainer if I wanted to - but by using an <asp:placeholder> control as the itemContainer I will prevent any id values or extra markup being generated.
Notice above how I've also defined an <EmptyDataTemplate>. This will display instead of the <LayoutTemplate> if I assign an empty sequence of data to the ListView. This will avoid us inadvertently displaying an empty <ul></ul> element in the event that there are no products in the catalog specified.
Once we've defined our template above, we can write some code in our code-behind file to retrieve our product data using LINQ to SQL, and bind our ListView with it:
VB:

C#:

And now when we run the page and supply a valid categoryid as a querystring argument we'll see our products dynamically pulled from the database:

If we try a category that doesn't contain products, we'll get our empty template message:

If you do a "view source" on the products page in the browser, you'll see that the markup generated from our ListView control is the same as what our static HTML was:

There are no ID elements or inline styles generated. We had complete control over every HTML element and attribute generated.
Step 5: Using a <asp:LinqDataSource> control instead of writing code
In our previous step above we wrote procedural LINQ to SQL code to databind our <asp:ListView>. This obviously works, and provides a great deal of control over the logic executed.Another option you can alternatively use is a declarative ASP.NET datasource control. All of the ASP.NET 2.0 datasource controls (SqlDataSource, ObjectDataSource, AccessDataSource, XmlDataSource, SiteMapDataSource, etc) work with the ListView. You can also use the new <asp:LinqDataSource> control with it. For more information on the LinqDataSource, check out my previous LINQ to SQL Part 5: Binding UI using the ASP:LinqDataSource Control blog post.
To use the <asp:LinqDataSource> in the above sample, we'll first delete the previous code we wrote in the code-behind file, and then click on the <asp:ListView> control in the designer and select the "Choose Data Source->New DataSource" option. We'll pick the "LINQ DataSource" option in the data source dialog, and then bind to the Northwind data model we created earlier.
We can then choose to bind the ListView against the "Products" entity collection in our Northwind data model:

We can then hit the "Where" button to configure a LINQ filter based on the "category" value in the querystring (we could alternatively bind the value from a form value, cookie, session value, another control, etc):

When we press the "ok" button the ListView's DataSourceID will be set to a new <asp:LinqDataSource> in the page:

And now without us having to have any code in the application we have a product listing with custom HTML UI databinding against our LINQ to SQL data model.
Step 6: Enabling Server Side Paging using the <asp:DataPager> control
Our last step with this sample will be to enable paging support over the products data. Specifically, we only want to display 6 products at a time on the page, and provide a nice page number UI to allow users to navigate forward and backwards over our product sequence.One of the other new controls in ASP.NET 3.5 is the <asp:DataPager> control - which makes data paging scenarios with the ListView control pretty easy. You can drop it anywhere you want on a page, and set its "PagedControlID" property to point at the ListView, and its "PageSize" property to indicate how many items in the ListView you want displayed at a time:

The <asp:DataPager> will then output navigation UI for your ListView:

And then if you click the "2" link in the paging UI above it will show you the remaining 5 products in the category:

The <asp:LinqDataSource> automatically uses LINQ to SQL's built-in support for server-side data paging to ensure that only 6 products (because the PageSize is 6) are ever retrieved from the database at a time. This means that your application and database will scale even if you have thousands of products in a specific category.
Disclaimer: The <asp:DataPager> in Beta2, though, does have some limitations in that it can't by default be driven off of a querystring value - which makes it not very SEO friendly. I'll cover how to fix this and support a querystring index in a future blog post.
Summary
Hopefully the above walkthrough provides a good first look overview of how to use the new <asp:ListView> control. You will find that this control provides you with complete control over the markup output sent down to a client - while still providing rich data paging, editing, deleting and insertion semantics. I'll cover many more of these scenarios (along with the ListView's cool grouping functionality) in future blog posts.Click here to download a copy of the above sample in order to try it out on your own machine.
Hope this helps - and have a great weekend!
Scott
Tuesday, 29 November 2011
update,delete,create new items in sharepoint list using LINQ in visual web part
from : http://debugmode.net/2010/11/10/linq-to-sharepoint-crud-operation-on-sharepoint-2010-list-using-splinq/
LINQ, SharePoint
LINQ to SharePoint: CRUD operation on SharePoint 2010 list using SPLinq
Posted by Dhananjay Kumar ⋅ November 10, 2010 ⋅ 1 Comment
Objective
In this article, we will see how to work with LINQ to SharePoint. I have tried to address all the common errors we encounter when first time we start using LINQ against SharePoint.
We will see ,
1. How to insert an item in SharePoint list using SPLinq
2. How to update an item in SharePoint list using SPLinq
3. How to delete an item in SharePoint list using SPLinq
4. How to fetch items from SharePoint list using SPLinq.
Advantage
1. SPLinq supports visual studio intellisense
2. SPLinq provides strong typecasting and data typing
3. SPLinq works without CAML query.
4. Using SPLinq , existing knowledge of LINQ could be apply to SharePoint development .
5. SPLinq provides completely language dependent development of SharePoint
6. Multiple list item insertion and deletion can be performed very easily with one syntax.
7. Join operation can be performed very easily on the related list
Using CAML when performing operation against SharePoint list was biggest challenge. CAML does not provide developer friendly syntaxes. SPLinq helps us to get rid of CAML.
SPLinq can be used with
1. Managed application , like windows or console or WPF
2. With SharePoint client object models.
3. With SharePoint webparts.
4. With SPGridView.
Challenge
The main challenge working with SPLInq is creation of entity class on command prompt. SPMetal creates a partial Entity class to apply Linq against that.
Assumption
We have a custom list
1. Name of the list is Test_Product.
2. Columns of the list is as below ,
clip_image002
3. There are two items in the list
clip_image004
4. URL of the SharePoint site is
“http://dhananjay-pc/my/personal/Test1
Now we need to fetch the list items in a managed console application using Linq to Sharepoint or SPLinq.
Follow the below steps,
Step1
Open the command prompt and change directory to
C:\Program Files\Common Files\Microsoft Shared\Web Server Extensions\14\BIN
Type command CD C:\Program Files\Common Files\Microsoft Shared\Web Server Extensions\14\BIN
clip_image006
Step2
Now we need to create the class for corresponding list definitions.
C:\Program Files\Common Files\Microsoft Shared\Web Server Extensions\14\BIN> spme
tal.exe /web:http://dhananjay-pc/my/personal/Test1 /namespace:nwind /code:Product.cs
In above command we are passing few parameters to spmetal.exe, they are as below
1. /web:Url
Here we need to provide URL of SharePoint site
/web:http://dhananjay-pc/my/personal/Test1 /
://dhananjay-pc/my/personal/Test1 / is URL of SharePoint site, I created for myself. You need to provide your SharePoint site URL here.
2. /namespace:nwind
This would be the namespace under which class of the list will get created. In my case name of the namespace would be nwind.
3. /code:Product.cs
This is the file name of the generated class. Since we are giving name Product for the file then class generated will be ProductDataContext
Step3
Open visual studio and create a new project of type console. Right click on the Project and select Properties
clip_image007
Click on the Build tab and change Platform Target to Any CPU.
clip_image009
Click on the Application tab and change the Target framework type to .Net Framework 3.5
clip_image011
Step4
The class we created in Step2 will by default get saved in the same folder with SPMetal.exe. So to see where the class got created we need to navigate to folder
C:\Program Files\Common Files\Microsoft Shared\Web Server Extensions\14\BIN
Add created class to the Project
Now add this class to the project. To do this, right click on the project and select Add existing item. Then browse to above path and select Product.cs
Add references to the Project
Microsoft.SharePoint
Microsoft.SharePoint.Linq
Right click on Reference and select Add Reference. To locate Microsoft.SharePoint and Microsoft.SharePoint.Linq dll browse to C:\Program Files\Common Files\Microsoft Shared\Web Server Extensions\14\ISAPI. All the SharePoint dll are here in this location.
Step5
Add the namespace
clip_image012
Nwind is the name of the namespace of the class we created in Step2.
Now console application project is ready for the CRUD operation on SharePoint 2010 list using SPLinq
Fetch the items from list using SPLinq
a. First we need to create instance of ProductContext class
clip_image014
Here we need to provide URL of the SharePoint site as parameter to constructor.
b. Now we can apply simple LINQ to access the list, like below.
clip_image016
c. There is one more way to access the list
clip_image018
Code for fetching list items
view source
print?
1 ProductDataContext context = new ProductDataContext("http://dhananjay-pc/my/personal/Test1");
2 var result = from r in context.Test1_Product select r;
3 foreach (var r in result)
4 {
5 Console.WriteLine(r.ProductId + ":" + r.ProductName + ":" + r.ProductPrice);
6 }
7 Console.ReadKey(true);
Output
clip_image020
Insert to SharePoint list using SPLinq
1. Create the instance of Data Context
clip_image022
2. Get the entity list where item would get inserted
clip_image024
3. Create instance of List item to be inserted
clip_image026
4. Call the InsertOnsubmit on the instance of Entity list.
clip_image027
5. Call sumitchange on the context
clip_image028
Code for inserting a list item
view source
print?
01 ProductDataContext context = new ProductDataContext("http://dhananjay-pc/my/personal/Test1");
02 EntityList products = context.GetList("Test1_Product");
03 Test1_ProductItem itemToInsert = new Test1_ProductItem()
04 {
05 ProductId = "9",
06 ProductName = "Soccer Ball",
07 ProductPrice = 600
08 };
09 products.InsertOnSubmit(itemToInsert);
10 context.SubmitChanges();
Update a Particular list item in SharePoint list
1. Create instance of Data Context
clip_image030
2. Fetch the list item to be updated using SPLInq
clip_image032
3. Modify the list item property wished to be updated. I am updating Product name to Dhananjay of Product Id 1
clip_image033
4. Call the submit change on the context
clip_image034
Code for updating a list item
view source
print?
1 ProductDataContext context = new ProductDataContext("http://dhananjay-pc/my/personal/Test1");
2 var itemToUpdate = (from r in context.Test1_Product where r.ProductId == "1" select r).First();
3 itemToUpdate.ProductName = "Dhananjay";
4 context.SubmitChanges();
Delete a Particular item from the list
1. Create the instance of Data Context
clip_image022[1]
2. Get the entity list where item would get inserted
clip_image024[1]
3. Fetch the list item to be deleted using SPLInq
clip_image032[1]
4. Call deleteonsubmit to delete a particular item from SharePoint list
clip_image035
5. Call the submit change on the context
clip_image034[1]
Code for deleting a list item
view source
print?
1 ProductDataContext context = new ProductDataContext("http://dhananjay-pc/my/personal/Test1");
2 EntityList products = context.GetList("Test1_Product");
3 var itemToDelete = (from r in context.Test1_Product where r.ProductId == "1" select r).First();
4 products.DeleteOnSubmit(itemToDelete);
5 context.SubmitChanges();
LINQ, SharePoint
LINQ to SharePoint: CRUD operation on SharePoint 2010 list using SPLinq
Posted by Dhananjay Kumar ⋅ November 10, 2010 ⋅ 1 Comment
Objective
In this article, we will see how to work with LINQ to SharePoint. I have tried to address all the common errors we encounter when first time we start using LINQ against SharePoint.
We will see ,
1. How to insert an item in SharePoint list using SPLinq
2. How to update an item in SharePoint list using SPLinq
3. How to delete an item in SharePoint list using SPLinq
4. How to fetch items from SharePoint list using SPLinq.
Advantage
1. SPLinq supports visual studio intellisense
2. SPLinq provides strong typecasting and data typing
3. SPLinq works without CAML query.
4. Using SPLinq , existing knowledge of LINQ could be apply to SharePoint development .
5. SPLinq provides completely language dependent development of SharePoint
6. Multiple list item insertion and deletion can be performed very easily with one syntax.
7. Join operation can be performed very easily on the related list
Using CAML when performing operation against SharePoint list was biggest challenge. CAML does not provide developer friendly syntaxes. SPLinq helps us to get rid of CAML.
SPLinq can be used with
1. Managed application , like windows or console or WPF
2. With SharePoint client object models.
3. With SharePoint webparts.
4. With SPGridView.
Challenge
The main challenge working with SPLInq is creation of entity class on command prompt. SPMetal creates a partial Entity class to apply Linq against that.
Assumption
We have a custom list
1. Name of the list is Test_Product.
2. Columns of the list is as below ,
clip_image002
3. There are two items in the list
clip_image004
4. URL of the SharePoint site is
“http://dhananjay-pc/my/personal/Test1
Now we need to fetch the list items in a managed console application using Linq to Sharepoint or SPLinq.
Follow the below steps,
Step1
Open the command prompt and change directory to
C:\Program Files\Common Files\Microsoft Shared\Web Server Extensions\14\BIN
Type command CD C:\Program Files\Common Files\Microsoft Shared\Web Server Extensions\14\BIN
clip_image006
Step2
Now we need to create the class for corresponding list definitions.
C:\Program Files\Common Files\Microsoft Shared\Web Server Extensions\14\BIN> spme
tal.exe /web:http://dhananjay-pc/my/personal/Test1 /namespace:nwind /code:Product.cs
In above command we are passing few parameters to spmetal.exe, they are as below
1. /web:Url
Here we need to provide URL of SharePoint site
/web:http://dhananjay-pc/my/personal/Test1 /
://dhananjay-pc/my/personal/Test1 / is URL of SharePoint site, I created for myself. You need to provide your SharePoint site URL here.
2. /namespace:nwind
This would be the namespace under which class of the list will get created. In my case name of the namespace would be nwind.
3. /code:Product.cs
This is the file name of the generated class. Since we are giving name Product for the file then class generated will be ProductDataContext
Step3
Open visual studio and create a new project of type console. Right click on the Project and select Properties
clip_image007
Click on the Build tab and change Platform Target to Any CPU.
clip_image009
Click on the Application tab and change the Target framework type to .Net Framework 3.5
clip_image011
Step4
The class we created in Step2 will by default get saved in the same folder with SPMetal.exe. So to see where the class got created we need to navigate to folder
C:\Program Files\Common Files\Microsoft Shared\Web Server Extensions\14\BIN
Add created class to the Project
Now add this class to the project. To do this, right click on the project and select Add existing item. Then browse to above path and select Product.cs
Add references to the Project
Microsoft.SharePoint
Microsoft.SharePoint.Linq
Right click on Reference and select Add Reference. To locate Microsoft.SharePoint and Microsoft.SharePoint.Linq dll browse to C:\Program Files\Common Files\Microsoft Shared\Web Server Extensions\14\ISAPI. All the SharePoint dll are here in this location.
Step5
Add the namespace
clip_image012
Nwind is the name of the namespace of the class we created in Step2.
Now console application project is ready for the CRUD operation on SharePoint 2010 list using SPLinq
Fetch the items from list using SPLinq
a. First we need to create instance of ProductContext class
clip_image014
Here we need to provide URL of the SharePoint site as parameter to constructor.
b. Now we can apply simple LINQ to access the list, like below.
clip_image016
c. There is one more way to access the list
clip_image018
Code for fetching list items
view source
print?
1 ProductDataContext context = new ProductDataContext("http://dhananjay-pc/my/personal/Test1");
2 var result = from r in context.Test1_Product select r;
3 foreach (var r in result)
4 {
5 Console.WriteLine(r.ProductId + ":" + r.ProductName + ":" + r.ProductPrice);
6 }
7 Console.ReadKey(true);
Output
clip_image020
Insert to SharePoint list using SPLinq
1. Create the instance of Data Context
clip_image022
2. Get the entity list where item would get inserted
clip_image024
3. Create instance of List item to be inserted
clip_image026
4. Call the InsertOnsubmit on the instance of Entity list.
clip_image027
5. Call sumitchange on the context
clip_image028
Code for inserting a list item
view source
print?
01 ProductDataContext context = new ProductDataContext("http://dhananjay-pc/my/personal/Test1");
02 EntityList
03 Test1_ProductItem itemToInsert = new Test1_ProductItem()
04 {
05 ProductId = "9",
06 ProductName = "Soccer Ball",
07 ProductPrice = 600
08 };
09 products.InsertOnSubmit(itemToInsert);
10 context.SubmitChanges();
Update a Particular list item in SharePoint list
1. Create instance of Data Context
clip_image030
2. Fetch the list item to be updated using SPLInq
clip_image032
3. Modify the list item property wished to be updated. I am updating Product name to Dhananjay of Product Id 1
clip_image033
4. Call the submit change on the context
clip_image034
Code for updating a list item
view source
print?
1 ProductDataContext context = new ProductDataContext("http://dhananjay-pc/my/personal/Test1");
2 var itemToUpdate = (from r in context.Test1_Product where r.ProductId == "1" select r).First();
3 itemToUpdate.ProductName = "Dhananjay";
4 context.SubmitChanges();
Delete a Particular item from the list
1. Create the instance of Data Context
clip_image022[1]
2. Get the entity list where item would get inserted
clip_image024[1]
3. Fetch the list item to be deleted using SPLInq
clip_image032[1]
4. Call deleteonsubmit to delete a particular item from SharePoint list
clip_image035
5. Call the submit change on the context
clip_image034[1]
Code for deleting a list item
view source
print?
1 ProductDataContext context = new ProductDataContext("http://dhananjay-pc/my/personal/Test1");
2 EntityList
3 var itemToDelete = (from r in context.Test1_Product where r.ProductId == "1" select r).First();
4 products.DeleteOnSubmit(itemToDelete);
5 context.SubmitChanges();
Monday, 28 November 2011
Creating SharePoint 2010 Web Parts That Can Read and Write Data to External Data Sources
This is from : http://msdn.microsoft.com/en-us/library/ff769953.aspx
SharePoint 2010

Summary: Learn how to use Microsoft Visual Studio 2010 to create a Visual Web Part that uses a Microsoft Business Connectivity Services (BCS) external content type in Microsoft SharePoint Server 2010 to read and write data to the AdventureWorks sample database.
Applies to: Microsoft SharePoint Server 2010 | Microsoft Business Connectivity Services (BCS) | Microsoft Visual Studio 2010
Provided by: Joel Krist, iSoftStone
 Microsoft Business Connectivity Services (BCS) in SharePoint 2010 (BCS) is provided with Microsoft Office 2010 and SharePoint 2010. Building on the functionality of the Business Data Catalog in Microsoft Office SharePoint Server 2007, it introduces new features, such as external system write-back support and rich client integration. Visual Studio 2010 introduces the Visual Web Part project template. It enables you to use the Visual Web Part Designer to create SharePoint Web Parts and then package and deploy them as part of the build process. This Visual How To demonstrates how to use Visual Studio 2010 to create a Visual Web Part that uses the BCS object model to work with an external content type based on the AdventureWorks Customer entity.
 This Visual How To contains the following sections to demonstrate how to create and use a Web Part that uses an external content type:
- Prerequisites for using the Web Part
- Using Visual Studio 2010 to create a Visual Web Part project
- Adding references to the Visual Web Part project
- Adding code to the Web Part to define its user interface and to add support for working with the external content type
- Building the Web Part, deploying it to SharePoint Server, and using it on a Web Part page
The Web Part that is demonstrated in this article works with a BCS external content type that is based on the Person.Contact, Sales.Customer, and Sales.Individual tables in the Microsoft SQL Server AdventureWorks sample database. The external content type is created in Microsoft SharePoint Designer 2010 and uses the AdventureWorks web service that is provided with the Microsoft SharePoint 2010 SDK.
This article focuses on how to create the Web Part. It does not describe in detail how to install the AdventureWorks sample database, deploy the AdventureWorks web service, or create the external content type in SharePoint Designer. Instead, it provides basic information about prerequisites and refers to other content for more information.
To use the Web Part that is described here, the following are required:
- A server that is running Microsoft SQL Server 2005 or Microsoft SQL Server 2008.
- The AdventureWorks 2005 online transaction processing (OLTP) database installed on the server that is running SQL Server. You can download the AdventureWorks sample databases from CodePlex.
- A server that is running SharePoint Server 2010.
- The sample AdventureWorks web service deployed on a web server. The web service is included with the Microsoft SharePoint 2010 SDK. By default, after you install the SDK, the AdventureWorks web service files are located in the following folder:
C:\Program Files (x86)\Microsoft SDKs\SharePoint Server 2010\Samples\Business Connectivity Services\bcs sample kit\BCS Sample Kit\LOB Systems\Adventure Works Web Service.
- Microsoft SharePoint Designer 2010 installed on the client computer.
- The WSCustomer external content type based on the AdventureWorks web service. The article How to: Create an External Content Type Based on a Web Service provides step-by-step instructions for creating the WSCustomer external content type in SharePoint Designer 2010.
Using Visual Studio 2010 to Create a Visual Web Part Project
The following procedure demonstrates how to create a Visual Web Part project.
To create a Visual Web Part project
- Start Visual Studio 2010 as an administrator.
- In Visual Studio, on the File menu, click New, and then click Project.
- In the New Project dialog box, in the Installed Templates pane, select the Visual C# SharePoint 2010 template type.
- In the templates list, select the Visual Web Part template.
- Name the project and solution CustomerWebPart, and then select .NET Framework 3.5 as the target framework version.
Figure 1. Creating the solution
- Click OK.
Visual Studio starts the SharePoint Customization Wizard. Enter the name of the local SharePoint site to use for debugging, and then click Finish.
Figure 2. SharePoint Customization Wizard
- Visual Studio creates the solution and opens the VisualWebPart1UserControl.ascx user control in the Code Editor.


The following procedure demonstrates how to add references to the Visual Web Part project.
To add references to the Visual Web Part project
- The Web Part sample code that is provided with this article uses the classes and enumerations in the Microsoft.BusinessData namespace that is provided by the Microsoft.BusinessData.dll assembly. Add a reference to the Microsoft.BusinessData assembly, as follows:
- In Visual Studio, click Project, and then click Add Reference.
- In the Add Reference dialog box, on the Browse tab, navigate to the following folder:
C:\Program Files\Common Files\Microsoft Shared\Web Server Extensions\14\ISAPI.
- Scroll down until the Microsoft.BusinessData.dll assembly is visible. Select the assembly, and then click OK.
Figure 3. Add a reference to Microsoft.BusinessData
- In Visual Studio, click Project, and then click Add Reference.
- The sample code uses the Color class, which is defined in the System.Drawing assembly. Add a reference to the System.Drawing assembly:
- In Visual Studio, click Project, and then click Add Reference.
- In the Add Reference dialog box, on the .NET tab, scroll down until the System.Drawing component is visible, select the component, and then click OK.
Figure 4. Add a reference to System.Drawing
- In Visual Studio, click Project, and then click Add Reference.


The user interface of the Web Part is simple. It consists of a series of text boxes that enable you to enter and display the WSCustomer external content type fields, and buttons to perform Create, Find Item, and Update operations on the external content type.
 Note: Note: |
|---|
| Because of table foreign key constraints, the sample AdventureWorks web service that is provided with the SharePoint 2010 SDK does not provide support for deleting customers from the AdventureWorks database. As a result, the Web Part in this article does not support deletion. |
To add code to the Web Part
- In Visual Studio, add the following markup to the VisualWebPart1UserControl.ascx file, after the default directives that were created by Visual Studio.
After you add this markup, when you view the VisualWebPart1UserControl.ascx user control in Design view, the user interface appears as shown in Figure 5.<style type="text/css"> .style3 { height: 81px; } .style4 { width: 119px; } .style5 { width: 559px; } .style6 { height: 81px; width: 119px; } .style7 { color : #FF3300; } </style> <table> <tr> <td colspan="2"> To work with the AdventureWorks Customer External Content Type (ECT) enter values for the ECT name and namespace, then do the following: <ul style="padding-left: 0px; margin-left: 14px"> <li>To create a new customer, leave the customer ID blank, enter values in the other fields, and then select <strong>Create New</strong>. </li> <li>To find a specific customer, enter the customer's ID and then select <strong>Find by ID</strong>. </li> <li>To update a customer, enter the customer's ID and updated values for the other fields and then select <strong>Update</strong>. </li> </ul> <asp:Label ID="StatusLabel" runat="server" ForeColor="#FF3300"></asp:Label> <br /> <br /> </td> </tr> <tr> <td align="left" class="style4"> ECT Name<span class="style7">*</span></td> <td class="style5"> <asp:TextBox ID="ECTName" runat="server" Width="100%"></asp:TextBox> </td> </tr> <tr> <td align="left" class="style4"> ECT Namespace<span class="style7">*</span></td> <td class="style5"> <asp:TextBox ID="ECTNamespace" runat="server" Width="100%"></asp:TextBox> </td> </tr> <tr> <td align="left" class="style4"> </td> <td class="style5"> </td> </tr> <tr> <td align="left" class="style4"> Customer ID</td> <td class="style5"> <asp:TextBox ID="CustomerID" runat="server"></asp:TextBox> </td> </tr> <tr> <td align="left" class="style4"> Title</td> <td class="style5"> <asp:TextBox ID="Title" runat="server"></asp:TextBox> </td> </tr> <tr> <td align="left" class="style4"> First Name</td> <td class="style5"> <asp:TextBox ID="FirstName" runat="server" Width="100%"></asp:TextBox> </td> </tr> <tr> <td align="left" class="style4"> Middle Name</td> <td class="style5"> <asp:TextBox ID="MiddleName" runat="server" Width="100%"></asp:TextBox> </td> </tr> <tr> <td align="left" class="style4"> Last Name</td> <td class="style5"> <asp:TextBox ID="LastName" runat="server" Width="100%"></asp:TextBox> </td> </tr> <tr> <td align="left" class="style4"> Email</td> <td class="style5"> <asp:TextBox ID="Email" runat="server" Width="100%"></asp:TextBox> </td> </tr> <tr> <td align="left" class="style4"> Phone</td> <td class="style5"> <asp:TextBox ID="Phone" runat="server" Width="100%"></asp:TextBox> </td> </tr> <tr> <td align="center" class="style6"> </td> <td align="center" class="style3"> <asp:Button ID="CreateNewCustomer" runat="server" OnClick="CreateNewCustomer_Click" Text="Create New" Width="120px" /> <asp:Button ID="FindCustomerByID" runat="server" OnClick="FindCustomerByID_Click" Text="Find by ID" Width="120px" /> <asp:Button ID="UpdateCustomer" runat="server" OnClick="UpdateCustomer_Click" Text="Update" Width="120px" /> <asp:Button ID="ClearAllFields" runat="server" onclick="ClearAllFields_Click" Text="Clear All Fields" Width="120px" /> </td> </tr> </table>
Figure 5. User Control user interface
- Right-click in the VisualWebPart1UserControl.ascx file, and then select View Code. The VisualWebPart1UserControl.ascx.cs file opens in the Visual Studio Code Editor.
- Replace the contents of the VisualWebPart1UserControl.ascx.cs file with the following code.
using System;
using System.Drawing;
using System.Web.UI;

using Microsoft.SharePoint.BusinessData.SharedService;
using Microsoft.BusinessData.MetadataModel;
using Microsoft.BusinessData.Runtime;
using Microsoft.SharePoint.Administration;
using Microsoft.SharePoint;

using Microsoft.BusinessData.Infrastructure;
using Microsoft.BusinessData.MetadataModel.Collections;

namespace CustomerWebPart.VisualWebPart1
{
  public partial class VisualWebPart1UserControl : UserControl
  {
    #region Properties

    protected string EntityNamespace
    {
      get { return ECTNamespace.Text.Trim(); }
    }

    protected string EntityName
    {
      get { return ECTName.Text.Trim(); }
    }

    protected bool EntityValuesAreSet
    {
      get
      {
        if (EntityNamespace == string.Empty ||
          EntityName == string.Empty)
          return false;
        else
          return true;
      }
    }

    #endregion

    protected void Page_Load(object sender, EventArgs e)
    {
    }

    #region Create Customer

    protected void CreateNewCustomer_Click(object sender,
      EventArgs e)
    {
      // Ensure that we have values for the entity namespace and name.
      if (!EntityValuesAreSet)
      {
        DisplaySetPropertyValuePrompt(true);
        return;
      }
      else
        DisplaySetPropertyValuePrompt(false);

      try
      {
        using (new Microsoft.SharePoint.SPServiceContextScope(
          SPServiceContext.GetContext(SPContext.Current.Site)))
        {
          // Get the BDC service and metadata catalog.
          BdcService service =
           SPFarm.Local.Services.GetValue<BdcService>(String.Empty);
          IMetadataCatalog catalog =
            service.GetDatabaseBackedMetadataCatalog(
            SPServiceContext.Current);

          // Get the entity by using the specified name and namespace.
          IEntity entity =
            catalog.GetEntity(EntityNamespace, EntityName);
          ILobSystemInstance LobSysteminstance =
            entity.GetLobSystem().GetLobSystemInstances()[0].Value;

          // Get the fields on the entity.
          IView createView =
            entity.GetCreatorView("CreateCustomer");
          IFieldValueDictionary valueDictionary =
            createView.GetDefaultValues();

          // Set the values of the entity fields.
          valueDictionary["EmailAddress"] = Email.Text;
          valueDictionary["FirstName"] = FirstName.Text;
          valueDictionary["LastName"] = LastName.Text;
          valueDictionary["MiddleName"] = MiddleName.Text;
          valueDictionary["Phone"] = Phone.Text;
          valueDictionary["Title"] = Title.Text;

          // Call the creator method and display the returned
          // Customer ID.
          Identity id = entity.Create(valueDictionary,
            LobSysteminstance);

          CustomerID.Text =
            id.GetIdentifierValues().GetValue(0).ToString();

          StatusLabel.ForeColor = Color.Green;
          StatusLabel.Text = "Customer successfully created.";
        }
      }
      catch (Exception ex)
      {
        StatusLabel.ForeColor = Color.Red;
        StatusLabel.Text = "Unable to create customer." +
          ex.Message;
      }
    }

    #endregion

    #region Find Customer By ID

    protected void FindCustomerByID_Click(
      object sender, EventArgs e)
    {
      // Ensure that we have values for the entity namespace and name.
      if (!EntityValuesAreSet)
      {
        DisplaySetPropertyValuePrompt(true);
        return;
      }
      else
        DisplaySetPropertyValuePrompt(false);

      // Do simple validation of the customer ID. Ensure that it is
      // an integer.
      int customerID = -1;

      if (!ValidateCustomerID(CustomerID.Text, ref customerID))
      {
        ClearFields(false);
        StatusLabel.ForeColor = Color.Red;
        StatusLabel.Text =
          "Please enter an integer for the Customer ID value.";
        return;
      }

      try
      {
        using (new Microsoft.SharePoint.SPServiceContextScope(
          SPServiceContext.GetContext(SPContext.Current.Site)))
        {
          // Get the BDC service and metadata catalog.
          BdcService service =
           SPFarm.Local.Services.GetValue<BdcService>(String.Empty);
          IMetadataCatalog catalog =
            service.GetDatabaseBackedMetadataCatalog(
            SPServiceContext.Current);

          // Get the entity by using the specified name and namespace.
          IEntity entity =
            catalog.GetEntity(EntityNamespace, EntityName);
          ILobSystemInstance LobSysteminstance =
            entity.GetLobSystem().GetLobSystemInstances()[0].Value;

          // Create an Identity based on the specified Customer ID.
          Identity identity = new Identity(customerID);

          // Get a method instance for the SpecificFinder method.
          IMethodInstance method =
            entity.GetMethodInstance("GetCustomerById",
            MethodInstanceType.SpecificFinder);

          // Execute the Specific Finder method to return the
          // customer data.
          IEntityInstance iei =
            entity.FindSpecific(identity, LobSysteminstance);

          // Display the data for the returned customer in the UI.
          Title.Text = iei["Title"] != null ?
            iei["Title"].ToString() : string.Empty;
          FirstName.Text = iei["FirstName"] != null ?
            iei["FirstName"].ToString() : string.Empty;
          MiddleName.Text = iei["MiddleName"] != null ?
            iei["MiddleName"].ToString() : string.Empty;
          LastName.Text = iei["LastName"] != null ?
            iei["LastName"].ToString() : string.Empty;
          Email.Text = iei["EmailAddress"] != null ?
            iei["EmailAddress"].ToString() : string.Empty;
          Phone.Text = iei["Phone"] != null ?
            iei["Phone"].ToString() : string.Empty;
        }
      }
      catch (Exception ex)
      {
        ClearFields(false);

        StatusLabel.ForeColor = Color.Red;
        StatusLabel.Text = "Unable to find customer with ID = " +
          CustomerID.Text + ". " + ex.Message;
      }
    }

    #endregion

    #region Update Customer

    protected void UpdateCustomer_Click(object sender, EventArgs e)
    {
      // Ensure that we have values for the entity namespace and name.
      if (!EntityValuesAreSet)
      {
        DisplaySetPropertyValuePrompt(true);
        return;
      }
      else
        DisplaySetPropertyValuePrompt(false);

      // Do simple validation of the customer ID. Ensure that it is
      // an integer.
      int customerID = -1;

      if (!ValidateCustomerID(CustomerID.Text, ref customerID))
      {
        StatusLabel.ForeColor = Color.Red;
        StatusLabel.Text =
          "Please enter an integer for the Customer ID value.";
        return;
      }

      try
      {
        using (new Microsoft.SharePoint.SPServiceContextScope(
          SPServiceContext.GetContext(SPContext.Current.Site)))
        {
          // Get the BDC service and metadata catalog.
          BdcService service =
           SPFarm.Local.Services.GetValue<BdcService>(String.Empty);
          IMetadataCatalog catalog =
            service.GetDatabaseBackedMetadataCatalog(
            SPServiceContext.Current);

          // Get the entity by using the specified name and namespace.
          IEntity entity =
            catalog.GetEntity(EntityNamespace, EntityName);
          ILobSystemInstance LobSysteminstance =
            entity.GetLobSystem().GetLobSystemInstances()[0].Value;

          // Create an Identity based on the specified Customer ID.
          Identity identity = new Identity(customerID);

          // Get a method instance for the Updater method.
          IMethodInstance method =
            entity.GetMethodInstance("UpdateCustomer",
            MethodInstanceType.Updater);

          // The UpdateCustomer method of the external content type
          // maps to the UpdateCustomer method in the AdventureWorks
          // web service. Looking at the source for the web service
          // shows that the UpdateCustomer method has the following
          // signature:
          //
          // public void UpdateCustomer(SalesCustomer customer)
          //
          // The SalesCustomer type has the following layout:
          //
          // public class SalesCustomer
          // {
          //     public int CustomerId { get; set; }
          //     public String Title { get; set; }
          //     public String FirstName { get; set; }
          //     public String MiddleName { get; set; }
          //     public String LastName   { get; set; }
          //     public String EmailAddress { get; set; }
          //     public String Phone { get; set; }
          //     public DateTime ModifiedDate { get; set; }
          // }

          // Get the collection of parameters for the method.
          // In this case, there is only one.
          IParameterCollection parameters =
            method.GetMethod().GetParameters();

          // Use type reflection to get an instance of a
          // SalesCustomer object to pass as a parameter.
          ITypeReflector reflector = parameters[0].TypeReflector;
          ITypeDescriptor rootTypeDescriptor =
            parameters[0].GetRootTypeDescriptor();

          object[] methodParamInstances =
            method.GetMethod().CreateDefaultParameterInstances(
            method);
          Object instance = methodParamInstances[0];

          // Get type descriptors for each of the SalesCustomer
          // members.
          ITypeDescriptor customerIDTypeDescriptor =
            rootTypeDescriptor.GetChildTypeDescriptors()[0];
          ITypeDescriptor titleTypeDescriptor =
            rootTypeDescriptor.GetChildTypeDescriptors()[1];
          ITypeDescriptor firstNameTypeDescriptor =
            rootTypeDescriptor.GetChildTypeDescriptors()[2];
          ITypeDescriptor middleNameTypeDescriptor =
            rootTypeDescriptor.GetChildTypeDescriptors()[3];
          ITypeDescriptor lastNameTypeDescriptor =
            rootTypeDescriptor.GetChildTypeDescriptors()[4];
          ITypeDescriptor emailAddressTypeDescriptor =
            rootTypeDescriptor.GetChildTypeDescriptors()[5];
          ITypeDescriptor phoneTypeDescriptor =
            rootTypeDescriptor.GetChildTypeDescriptors()[6];
          ITypeDescriptor modifiedDateTypeDescriptor =
            rootTypeDescriptor.GetChildTypeDescriptors()[7];

          // Set the values of the SalesCustomer object members
          // with the values specified by the user.
          reflector.Set(customerIDTypeDescriptor,
            rootTypeDescriptor,
            ref instance, customerID);
          reflector.Set(titleTypeDescriptor, rootTypeDescriptor,
            ref instance, Title.Text);
          reflector.Set(firstNameTypeDescriptor, rootTypeDescriptor,
            ref instance, FirstName.Text);
          reflector.Set(middleNameTypeDescriptor,
            rootTypeDescriptor,
            ref instance, MiddleName.Text);
          reflector.Set(lastNameTypeDescriptor, rootTypeDescriptor,
            ref instance, LastName.Text);
          reflector.Set(emailAddressTypeDescriptor,
            rootTypeDescriptor,
            ref instance, Email.Text);
          reflector.Set(phoneTypeDescriptor, rootTypeDescriptor,
            ref instance, Phone.Text);
          reflector.Set(modifiedDateTypeDescriptor,
            rootTypeDescriptor,
            ref instance, DateTime.Now);

          // Execute the updater method, passing the parameter.
          entity.Execute(method, LobSysteminstance,
            ref methodParamInstances);

          StatusLabel.ForeColor = Color.Green;
          StatusLabel.Text = "Customer successfully updated.";
        }
      }
      catch (Exception ex)
      {
        StatusLabel.ForeColor = Color.Red;
        StatusLabel.Text = "Unable to find customer with ID = " +
          CustomerID.Text + ". " + ex.Message;
      }
    }

    #endregion

    #region Helpers

    protected void DisplaySetPropertyValuePrompt(bool showPrompt)
    {
      if (showPrompt)
      {
        StatusLabel.ForeColor = Color.Red;
        StatusLabel.Text =
          "Please enter values for the ECT name and namespace!";
      }
      else
        StatusLabel.Text = string.Empty;
    }

    protected void ClearAllFields_Click(object sender, EventArgs e)
    {
      ClearFields(true);
    }

    protected bool ValidateCustomerID(string CustomerIDIn,
      ref int CustomerIDOut)
    {
      try
      {
        CustomerIDOut = Convert.ToInt32(CustomerIDIn);
        return true;
      }
      catch
      {
        CustomerIDOut = -1;
        return false;
      }
    }

    protected void ClearFields(bool clearCustomerID)
    {
      if (clearCustomerID)
        CustomerID.Text = string.Empty;

      Title.Text = string.Empty;
      FirstName.Text = string.Empty;
      MiddleName.Text = string.Empty;
      LastName.Text = string.Empty;
      Email.Text = string.Empty;
      Phone.Text = string.Empty;
    }

    #endregion
  }
}

The following procedure demonstrates how to build, deploy, and use the Web Part.
To build, deploy, and use the Web Part
- In Visual Studio, on the Build menu, click Deploy Solution.
Visual Studio builds the Web Part assembly, creates the required feature and deployment files, packages everything into a SharePoint solution package, and deploys it to the local SharePoint site that you specified when you created the solution.
Figure 6. Building and deploying the Web Part
- Browse to the SharePoint site that you deployed the Web Part to.
- On the Site Actions menu, click New Page.
Figure 7. New Page dialog box
- In the New Page dialog box, type a name for the new page, and then click Create. SharePoint Server creates the new page and navigates to it.
- On the new page, on the Insert tab, in the Web Parts group, click Web Part.
Figure 8. Adding the Web Part to the page
- SharePoint Server displays the user interface that you can use to select the Web Part. Under Categories, select Custom. The Visual Web Part appears in the list of available Web Parts. Select the Web Part, and then click Add.
Figure 9. Selecting the Web Part
The Web Part is added to the page.
Figure 10. Web Part on the page
- Save the changes to the page by clicking the Save icon above the ribbon.
- Enter values for the external content type name and namespace.
If you followed the steps in How to: Create an External Content Type Based on a Web Service exactly, the external content type name is WSCustomer, and the namespace is based on the name of the web server that is hosting the AdventureWorks web service. To determine the external content type name and namespace, follow these steps:
- Open the SharePoint Central Administration site on the server that you deployed the external content type to by using SharePoint Designer.
- Select Application Management.
- On the Application Management page, select Manage service applications.
- On the Service Applications page, select the link for the Business Data Connectivity Service Application.
The Service Application Information page appears. The details of the AdventureWorks WSCustomer external content type are listed.
Figure 11. External content type details
- Open the SharePoint Central Administration site on the server that you deployed the external content type to by using SharePoint Designer.
- In the Web Part user interface, enter a valid value for the Customer ID. You can determine valid customer IDs by using a tool such as SQL Server Management Studio to query the Sales.Individual table in the AdventureWorks database.
- Click Find by ID.
The Web Part displays the data for the customer who has the specified ID. It is retrieved from the AdventureWorks database via the external content type by using the AdventureWorks web service.
Figure 12. Web Part displaying AdventureWorks customer data
- Modify the data for the customer, leaving the Customer ID unchanged, and then click Update. The Web Part uses the external content type to update the customer data.
Figure 13. Updating customer data
- Create a new customer by clicking Clear All Fields and then entering data for a new customer, leaving the Customer ID field blank. Click Create New, and the Web Part uses the external content type to add a new customer to the AdventureWorks database.
Figure 14. Creating a new Customer
You can use SQL Server Management Studio to query the AdventureWorks database to verify that the Web Part operations via the external content type are working correctly.
Figure 15. SQL Server Management Studio


 This Visual How To provides steps and sample code that demonstrate how to use Visual Studio 2010 to create a Visual Web Part that uses a BCS external content type to read and write data to the AdventureWorks database. The sample code shows how to use the Create, Specific Finder, and Update methods of the external content type, which is based on the sample AdventureWorks web service that is provided with the SharePoint 2010 SDK.
Each method in the Web Part uses the same approach to get references to the BDC Shared Service and the metadata catalog on the server and to retrieve the customer entity from the catalog.
// Get the BDC service and metadata catalog.
BdcService service =
  SPFarm.Local.Services.GetValue<BdcService>(String.Empty);
IMetadataCatalog catalog = service.GetDatabaseBackedMetadataCatalog(
  SPServiceContext.Current);

// Get the entity by using the specified name and namespace.
IEntity entity =
  catalog.GetEntity(EntityNamespace, EntityName);
ILobSystemInstance LobSysteminstance =
  entity.GetLobSystem().GetLobSystemInstances()[0].Value;
// Get the fields on the entity.
IView createView = entity.GetCreatorView("CreateCustomer");
IFieldValueDictionary valueDictionary =
  createView.GetDefaultValues();

// Set the values of the entity fields.
valueDictionary["EmailAddress"] = Email.Text;
valueDictionary["FirstName"] = FirstName.Text;
valueDictionary["LastName"] = LastName.Text;
valueDictionary["MiddleName"] = MiddleName.Text;
valueDictionary["Phone"] = Phone.Text;
valueDictionary["Title"] = Title.Text;

// Call the creator method and display the returned
// Customer ID.
Identity id = entity.Create(valueDictionary,
  LobSysteminstance);
// Create an Identity based on the specified Customer ID.
Identity identity = new Identity(customerID);

// Get a method instance for the SpecificFinder method.
IMethodInstance method =
  entity.GetMethodInstance("GetCustomerById",
  MethodInstanceType.SpecificFinder);

// Execute the Specific Finder method to return the
// customer data.
IEntityInstance iei =
  entity.FindSpecific(identity, LobSysteminstance);
// Create an Identity based on the specified Customer ID.
Identity identity = new Identity(customerID);

// Get a method instance for the Updater method.
IMethodInstance method =
  entity.GetMethodInstance("UpdateCustomer",
  MethodInstanceType.Updater);

// Get the collection of parameters for the method.
// In this case, there is only one.
IParameterCollection parameters =
  method.GetMethod().GetParameters();

// Use type reflection to get an instance of a
// SalesCustomer object to pass as a parameter.
ITypeReflector reflector = parameters[0].TypeReflector;
ITypeDescriptor rootTypeDescriptor =
  parameters[0].GetRootTypeDescriptor();

object[] methodParamInstances =
  method.GetMethod().CreateDefaultParameterInstances(
  method);
Object instance = methodParamInstances[0];

// Get type descriptors for each of the SalesCustomer
// members.
ITypeDescriptor customerIDTypeDescriptor =
  rootTypeDescriptor.GetChildTypeDescriptors()[0];
ITypeDescriptor titleTypeDescriptor =
  rootTypeDescriptor.GetChildTypeDescriptors()[1];
ITypeDescriptor firstNameTypeDescriptor =
  rootTypeDescriptor.GetChildTypeDescriptors()[2];
ITypeDescriptor middleNameTypeDescriptor =
  rootTypeDescriptor.GetChildTypeDescriptors()[3];
ITypeDescriptor lastNameTypeDescriptor =
  rootTypeDescriptor.GetChildTypeDescriptors()[4];
ITypeDescriptor emailAddressTypeDescriptor =
  rootTypeDescriptor.GetChildTypeDescriptors()[5];
ITypeDescriptor phoneTypeDescriptor =
  rootTypeDescriptor.GetChildTypeDescriptors()[6];
ITypeDescriptor modifiedDateTypeDescriptor =
  rootTypeDescriptor.GetChildTypeDescriptors()[7];

// Set the values of the SalesCustomer object members
// with the values specified by the user.
reflector.Set(customerIDTypeDescriptor, rootTypeDescriptor,
  ref instance, customerID);
reflector.Set(titleTypeDescriptor, rootTypeDescriptor,
  ref instance, Title.Text);
reflector.Set(firstNameTypeDescriptor, rootTypeDescriptor,
  ref instance, FirstName.Text);
reflector.Set(middleNameTypeDescriptor, rootTypeDescriptor,
  ref instance, MiddleName.Text);
reflector.Set(lastNameTypeDescriptor, rootTypeDescriptor,
  ref instance, LastName.Text);
reflector.Set(emailAddressTypeDescriptor, rootTypeDescriptor,
  ref instance, Email.Text);
reflector.Set(phoneTypeDescriptor, rootTypeDescriptor,
  ref instance, Phone.Text);
reflector.Set(modifiedDateTypeDescriptor, rootTypeDescriptor,
  ref instance, DateTime.Now);

// Execute the updater method, passing the parameter.
entity.Execute(method, LobSysteminstance,
  ref methodParamInstances);
Subscribe to:
Comments (Atom)